Wednesday, April 23, 2014

IR Receiver extension for Ambilight raspberry pi clone

After working with my ambilight clone for a few days, I discovered the biggest annoyance was that it wouldn't turn off after turning off the TV.  I had some ideas on how I could remotely trigger it from the phone or from an external HTPC but I really wanted a self contained solution in case I decided to swap the HTPC for a FireTV or a Chromecast.

This brought me to trying to do it directly via my remote.  My HTPC uses a mceusb, so I was tempted to just get another mceusb for the pi.  This would have been overkill though, the pi has tons of unused GPIO's, it can be done far simpler (and cheaper).

I looked into it and discovered that someone actually already wrote a kernel module that directly controls an IR sensor on a GPIO.  The kernel module is based off the existing lirc_serial module, but adapted specifically for the raspberry pi.  (See http://aron.ws/projects/lirc_rpi/ for more information)
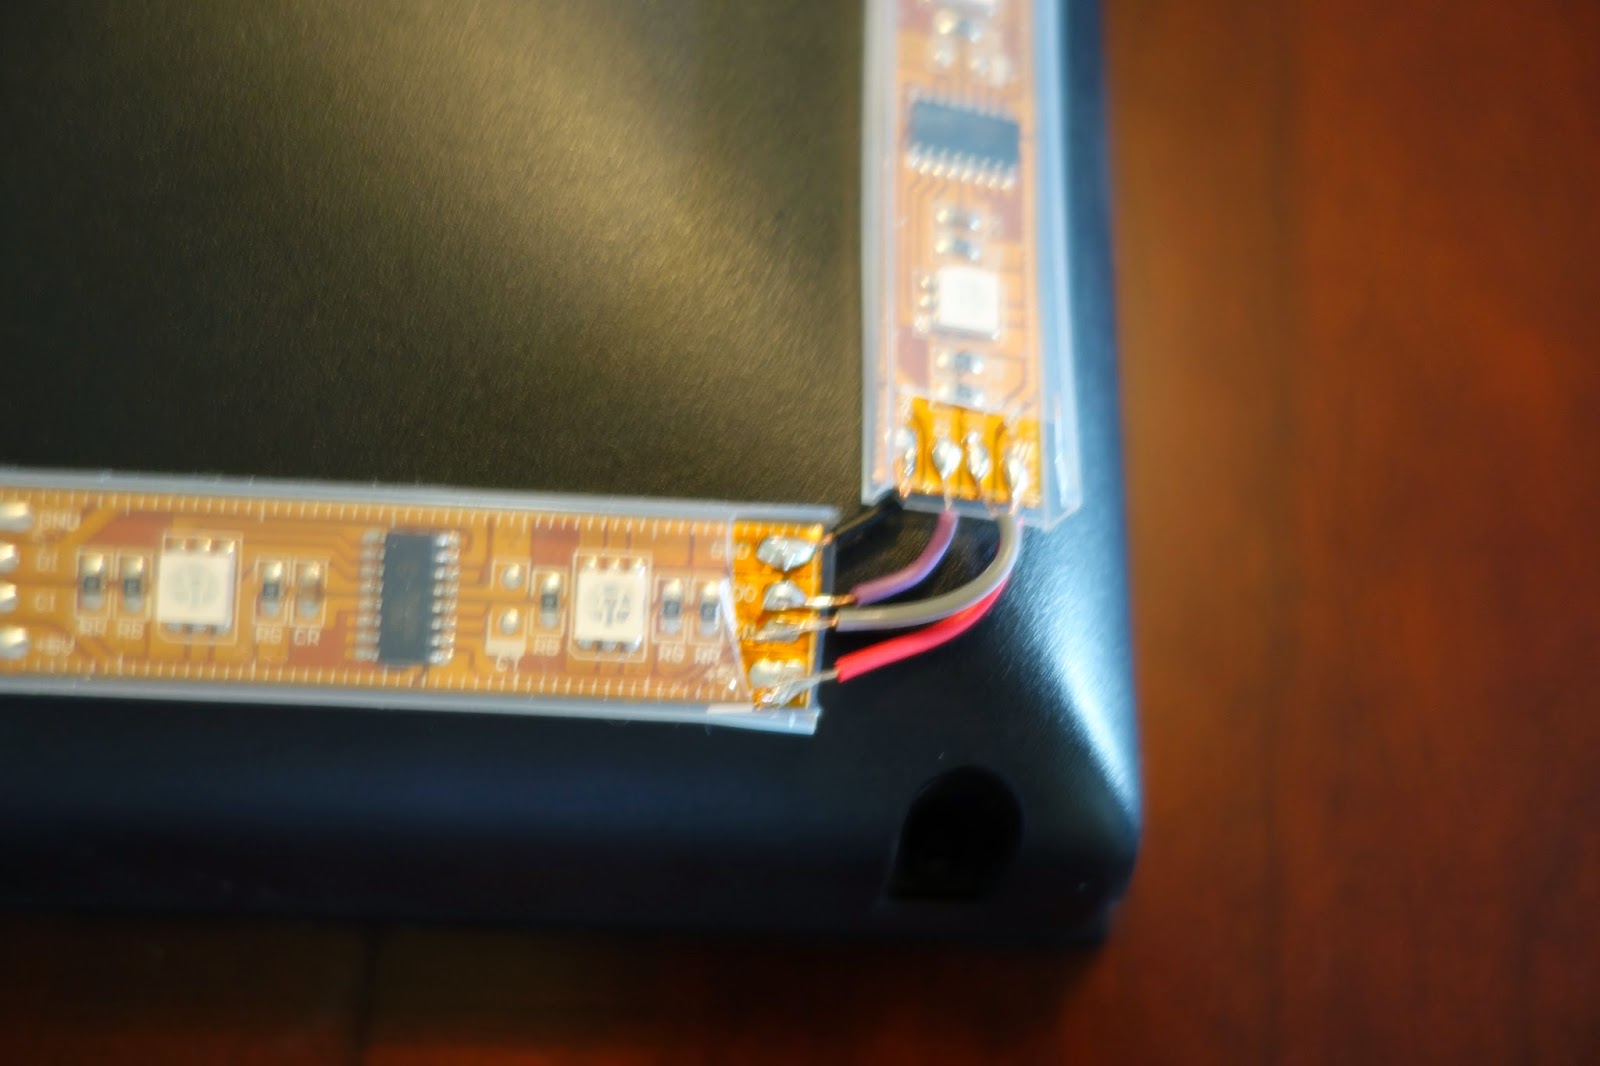
Hardware

All that's necessary is a 38 kHz IR sensor.  You'll spend under $5 on one of them on Amazon (plus some shipping) or you can get one from radio shack if you want something quick and local.  I spent $4.87 on one at my local radio shack.

The sensor is really simple, 3 pins.  All 3 pins are available in the pi's header.  One goes to 3.3V rail, one to ground, and one to a spare GPIO.  There's a few places on the header that you can use for each.  Just make sure you match up the pinout to the sensor you get.  I chose to use GPIO 22 as it's most convenient for my lego case.  The lirc_rpi defaults to GPIO 18.

Some notes to keep in mind:

  1. While soldering it, be cognizant of which way you want the sensor to face so that it can be accessed from the remote.  
  2. Remember that you are connecting to 3.3V and Ground from the Pi header.  The ground connection won't be the same as your rail that was used to power the pi if you are powering via USB.  
  3. The GPIO pins are not rated for 5V, so be sure to connect to the 3.3V.


Software


LIRC is available directly in the raspbian repositories.  Install it like this:

# sudo apt-get install lirc

Manually load the module so that you can test it.

# sudo modprobe lirc_rpi gpio_in_pin=22

Now use mode2 to test that it's working.  Once you run the command, press some buttons on your remote.  You should be output about space, pulse and other stuff.  Once you're satisfied, press ctrl-c to exit.

# mode2 -d /dev/lirc0

Now, add the modules that need to be loaded to /etc/modules.  If you are using a different GPIO than 18, specify it here again.  This will make sure that lirc_rpi loads on boot.

/etc/modules

lirc_dev
lirc_rpi gpio_in_pin=22


Now modify /etc/lirc/hardware.conf to match this configuration to make it work for the rpi:

/etc/lirc/hardware.conf

# /etc/lirc/hardware.conf
#
# Arguments which will be used when launching lircd
LIRCD_ARGS="--uinput"

#Don't start lircmd even if there seems to be a good config file
#START_LIRCMD=false

#Don't start irexec, even if a good config file seems to exist.
#START_IREXEC=false

#Try to load appropriate kernel modules
LOAD_MODULES=true

# Run "lircd --driver=help" for a list of supported drivers.
DRIVER="default"
# usually /dev/lirc0 is the correct setting for systems using udev 
DEVICE="/dev/lirc0"
MODULES="lirc_rpi"

# Default configuration files for your hardware if any
LIRCD_CONF=""
LIRCMD_CONF=""

Next, we'll record the buttons that you want the pi to trigger the backlight toggle on.  I chose to do it on the event of turning the TV on or off.  For me I actually have a harmony remote that has separate events for "Power On" and "Power Off" available.  So I chose to program KEY_POWER and KEY_POWER2.  If you don't have the codes available for both "Power On" and "Power Off" then you can just program "Power Toggle" to KEY_POWER.

# irrecord -d /dev/lirc0 ~/lircd.conf

Once you have the lircd.conf recorded, move it into /etc/lirc to overwrite /etc/lirc/lircd.conf and start lirc

# sudo mv /home/pi/lircd.conf /etc/lirc/lircd.conf
# sudo /etc/init.d/lirc start

With lirc running you can examine that it's properly recognizing your key event using the irw command.  Once irw is running, press the button on the remote and make sure your pi recognizes it.  Once you're done press ctrl-c to exit.

# irw

Now that you've validated the pi can recognize the command, it's time to tie it to an actual script.  Create /home/pi/.lircrc with contents like this:

/home/pi/.lircrc

begin
     button = KEY_POWER
     prog = irexec
     repeat = 0
     config = /home/pi/toggle_backlight.sh off
end

begin
     button = KEY_POWER2
     prog = irexec
     repeat = 0
     config = /home/pi/toggle_backlight.sh on
end

My toggle_backlight.sh looks like this:

/home/pi/toggle_backlight.sh

#!/bin/sh
ARG=toggle
if [ -n "$1" ]; then
ARG=$1
fi
RUNNING=$(pgrep hyperion-v4l2)
if [ -n "$RUNNING" ]; then
if [ "$ARG" = "on" ]; then
exit 0
fi
pkill hyperion-v4l2
hyperion-remote --color black
exit 0
fi
if [ "$ARG" = "off" ]; then
hyperion-remote --color black
exit 0
fi
#spawn hyperion remote before actually clearing channels to prevent extra flickers
hyperion-v4l2 --crop-height 30 --crop-width 10 --size-decimator 8 --frame-decimator 2 --skip-reply --signal-threshold 0.08&
hyperion-remote --clearall


To test, run irexec and then press your remote button.  With any luck irexec will launch the toggle script and change your LED status.

# irexec

Lastly, you need to add irexec to your /etc/rc.local to make it boot with the pi.  Make sure you put the execution before the exit 0

/etc/rc.local

su pi -c "irexec -d"
su pi -c "/home/pi/toggle_backlight.sh off"

Reboot your pi, and make sure everything works together.  

# sudo reboot


Monday, April 21, 2014

Ambilight clone using Raspberry Pi

Recently I came across www.androidpolice.com/2014/04/07/new-app-huey-synchronizes-philips-hue-lights-with-your-movies-and-tv-shows-for-awesome-ambient-lighting-effects/ and thought it was pretty neat.  The lights were expensive however, and it required your phone or tablet to be in use every time you wanted to use it which seemed sub-optimal.

I've been hunting for a useful project to do with my Raspberry Pi, and found out that there were two major projects centered around getting something similar setup.

Ambi-TV: https://github.com/gkaindl/ambi-tv
Hyperion: https://github.com/tvdzwan/hyperion/wiki

With both software projects, you take an HDMI signal, convert it to analog and then capture the analog signal to analyze.  Once the signal is analyzed a string of addressable LED's is programmed to match what the borders are colored.
I did my initial setup using both software packages but in the end preferred using Hyperion for it's easy of use of configuration and results.

Necessary Hardware

I purchased the following (links point to where I purchased):
Other stuff I already had on hand that was needed:
  • Soldering tools
  • Spare prototyping board
  • Raspberry pi w/ case
  • Extra HDMI cables
  • Analog Composite cable 
  • Spare wires

Electronics Setup

Once everything arrived, I soldered a handful of wires to a prototyping board so that I could house more of the pieces in the raspberry pi case.  I used a cut up micro USB cord to provide power from the 5V rail and ground to the pi itself and then also to one end of the 4 pin JST adapter.

Prototyping board, probably this size is overkill,
but I have flexibility for future projects to add on now.
The power comes into the board and is used to power both the LEDs and the the raspberry pi from a single power source.  The clock and data lines for the LED string are connected to some header cable to plug into the raspberry pi.

GPIO connectors

The clock and data lines on the LPD8806 strip (DI/CI)  matched up to these pins on the raspberry pi:
Pin 19 (MOSI)          LPD8806 DAT pin
Pin 23 (SCLK)          LPD8806 CLK pin
Although it's possible to power the raspberry pi from the 5V and ground rails in the GPIO connector on the pi instead of micro USB, there is no over current protection on those rails.  In case of any problems with a current spike the pi would be toast.

Case

Once I got everything put into the pi properly, I double checked all the connections and closed up the case.
My pi case with the top removed and an
inset put in for holding the proto board
Whole thing assembled

TV mounted LEDs

I proceeded to do the TV.  I have a 46" set, which works out to 18 LEDs on either side and 30 LEDs on the top and bottom.  I cut up the LED strips and used double sided tape to affix to the TV.  Once the LED strips are cut up you have to solder 4 pins from the out end of one strip to the in end of another strip.  I'd recommend looking for some of the prebuilt L corner strips if you do this.  I didn't use them and it was a pain to strip and hold such small wires in place to solder in the small corners.  All of the pins that are marked "out" on one end of the LED strip get connected to the "in" end on the next strip.

Back of TV w/ LEDs attached

Corner with wires soldered on from out to in

External hardware Setup

From the output of my receiver that would be going to my TV, I connect it to the input of the HDMI splitter.
The HDMI splitter's primary output goes to the TV.
The secondary output goes to the HDMI2AV adapter.
The HDMI2AV adapter's composite video output gets connected to the video input of the USB grabber.
The USB grabber is plugged directly into the raspberry pi.


Software Setup

Once all the HW was together I proceeded to get the software set up.  I originally had an up to date version of raspbian wheezy installed.  It included an updated kernel (version 3.10).  I managed to set everything up using it except the grabber, but then discovered that there were problems with the USB grabber I purchased.
Plugging it in causes the box to kernel panic.  The driver for the USB grabber has made it upstream in kernel version 3.11, so I expected it should be usable in 3.10 with some simple backporting tweaks, but didn't narrow it down entirely.

I did find out that kernel 3.6.11 did work with an earlier version of the driver however, so I re-did my install using an older snapshot of raspbian.  I managed to get things working there, but would like to iron out the problems causing a kernel panic at some point.

USB Grabber instructions

The USB grabber I got is dirt cheap but not based off the really common chipsets already supported in the kernel with the versions in raspbian, so it requires some extra work.
  1. Install Raspbian snapshot from 2013-07-26.  Configure as desired.
  2. git clone https://github.com/gkaindl/ambi-tv.git ambi-tv
  3. cd ambi-tv/misc && sudo sh ./get-kernel-source.sh
  4. cd usbtv-driver && make
  5. sudo mkdir /lib/modules/3.6.11+/extra
  6. sudo cp usbtv.ko /lib/modules/3.6.11+/extra/
  7. sudo depmod -a

Hyperiond Instructions

After getting the grabber working, installing hyperion is a piece of cake.  This will set up hyperiond to start on boot.
  1. wget -N https://raw.github.com/tvdzwan/hyperion/master/bin/install_hyperion.sh
  2. sudo sh ./install_hyperion.sh
  3. Edit /etc/modprobe.d/raspi-blacklist.conf using nano.  Comment out the line with blacklist spi-bcm2708
  4. sudo reboot

Hyperion configuration file

From another PC that has java (OpenJDK 7 works on Ubuntu 14.04)
  1. Visit https://github.com/tvdzwan/hyperion/wiki/configuration and fetch the jar file.
  2. Run it to configure your LEDs.
  3. From the defaults, I particularly had to change the LED type and the number of LEDs around the TV.
  4. My LEDs were originally listed at RGB but I later discovered that they are GRB.  If you encounter problems later with the wrong colors showing up, you can change them here too.
  5. Save the conf file and scp it into the /etc directory on your pi
  6. sudo /etc/init.d/hyperiond restart

Test the LED's

  1. Plug in the LEDs and install the test application at https://github.com/tvdzwan/hyperion/wiki/android-remote
  2. Try out some of the patterns and color wheel to make sure that everything is working properly.  It will save you problems later diagnosing grabber problems if you know things are sound here (this is where I found my RGB/GRB problem).
Test pattern

Set up things for Hyperion-V4L2

I created a script in ~ called toggle_backlight.sh.  It runs the V4L2 capture application (hyperion-v4l2) and sets the LEDs accordingly.  I can invoke it again to turn off the LEDs.  As a future modification I intend to control this with my harmony remote or some other method.  If someone comes up with something cool, please share.

#!/bin/sh
ARG=toggle
if [ -n "$1" ]; then
        ARG=$1
fi
RUNNING=$(pgrep hyperion-v4l2)
if [ -n "$RUNNING" ]; then
        if [ "$ARG" = "on" ]; then
                exit 0
        fi
        pkill hyperion-v4l2
        exit 0
fi
hyperion-v4l2 --crop-height 30 --crop-width 10 --size-decimator 8 --frame-decimator 2 --skip-reply --signal-threshold 0.08&

That's the exact script I use to run things.  I had to modify the crop height from the defaults that were on the directions elsewhere to avoid flicker on the top.  To diganose problems here, I'd recommend using the --screenshot argument of hyperion-v4l2 and examining output.

Once you've got it good, add it to /etc/rc.local to start up on boot:

su pi -c /home/pi/toggle_backlight.sh

Test It all together

Everything should now be working.

Here's my working setup:

Tuesday, January 15, 2013

Multi-homed MythTV backend

This is the first of my non OpenWRT related posts.

I have a peculiar situation.  I have two houses that I split my life between.  I don't want to pay for cable in both houses, but I also want access to some of the TV shows that you only get newer episodes on cable and not via Netflix/Hulu/Amazon.

So to solve this, I have set up MythTV in both houses.  Both setups run Mythbuntu 12.04.1 (www.mythbuntu.org).  In the house without cable I have a Silicondust HD Homerun.


The HD Homerun is set to record OTA content exclusively.  I get all the basic TV networks this way in that house.

In the second house I have a Silicondust HD Homerun Prime.  I'm fortunate that in that house I have Comcast, which is one of the more friendly companies with regard to copy protection.  I'm able to record pretty much everything except the premium networks like HBO and Showtime.
 

In the second house I duplicate all the OTA recording schedules but also schedule things on the other stations I care about.

Secondary House

Now to get the recordings from the second house to the first house, I had to setup a collection of scripts that run in staggered cron jobs.  The first one is on the secondary house.  I first determined which channel ID's I needed to export from.  This can be found by looking through mythweb or by examining the database with a tool like phpmyadmin.  Look for 'chanid' in the 'channels' table.

Once I had those channels figured out I created this script.  On each daily run it will find all the recordings who's starttime happened to be "today".  It exports all relevant SQL data about that recording into a flat SQL file that can be imported on the primary house.

Next it creates a list of recordings that will need to be synced over to the primary house.  This list is based upon the last successful sync date from the primary house.  It only syncs all recordings between the lastrun date and "tomorrow".  This sets it up so that if for some reason the primary backend doesn't sync a day it will still work.  Also it's important to sync only a handful of days because the autoexpire will be happening at different rates on the two backends.

I store all this content in the directory /var/lib/mythtv/exported-sql

sudo mkdir -p /var/lib/mythtv/exported-sql 
sudo chown mythtv:mythtv /var/lib/mythtv/exported-sql

/home/mythtv/export.sh 

#!/bin/sh

#export SQL
chanid="2657 2659 2622"
DIRECTORY=/var/lib/mythtv/exported-sql/
BIGGEST_DATE=`find $DIRECTORY -maxdepth 1 -name '*.sql' | sort -r | head -1 | sed 's,.*exported-,,; s,.sql,,'`
for chan in $chanid;
do
[ -n "$where" ] && where="$where or"
[ -n "$BIGGEST_DATE" ] && date=" and starttime > '$BIGGEST_DATE 00:00:00'"
where="$where (chanid='$chan'$date)"
done
CONFIG=$HOME/.mythtv/config.xml
DATE=`date '+%F'`
if [ "$DATE" = "$BIGGEST_DATE" ]; then
echo "Already ran today, not running SQL generation again"
else
db=`xpath  -q -e 'string(//DatabaseName)' $CONFIG 2>/dev/null`
user=`xpath  -q -e 'string(//UserName)' $CONFIG 2>/dev/null`
pass=`xpath  -q -e 'string(//Password)' $CONFIG 2>/dev/null`
host=`xpath  -q -e 'string(//Host)' $CONFIG 2>/dev/null`
fname=/var/lib/mythtv/exported-sql/exported-$DATE.sql
mysqldump -h$host -u$user -p$pass $db recorded recordedseek recordedrating recordedprogram recordedmarkup recordedcredits --where="$where" --no-create-db --no-create-info > $fname
fi


#generate a recordings list
lastrun=/home/mythtv/lastrun
tomorrow=$(date --date="tomorrow" '+%Y%m%d')
if [ -f $lastrun ]; then
        tmp=$(cat $lastrun)
else
        tmp=$tomorrow
fi
while [ "$tmp" != "$tomorrow" ]
do
        test_dates="$test_dates $tmp"
        tmp=$(date --date="1 day $tmp" '+%Y%m%d')
done
test_dates="$test_dates $tomorrow"
for date in $test_dates;
do
        for chan in $chanid;
        do
                from="$from /var/lib/mythtv/recordings/${chan}_${date}*"
        done
done
ls $from 2>/dev/null | tee /var/lib/mythtv/exported-sql/recordings-list

Next I set up rsync to export my /var/lib/mythtv directory (read only) and my lastrun successful (write only).

/etc/rsyncd.conf

max connections = 2
log file = /var/log/rsync.log
timeout = 300

[mythtv]
comment = mythtv
path = /var/lib/mythtv
read only = yes
list = yes
uid = nobody
gid = nogroup
auth users = rsync
secrets file = /etc/rsyncd.secrets

[lastrun]
comment = last rsync run
path = /home/mythtv/
write only = yes
read only = no
list = no
uid = mythtv
gid = mythtv
auth users = rsync
secrets file = /etc/rsyncd.secrets

Last thing to do on the secondary house is to set up the crontab to run at night.  I set it for 11:05 PM every day.  It should only take a 10-15 seconds to run.

5 23 * * * /home/mythtv/export.sh

Because of the way this all works, I decide to leave my secondary house backend on all the time.  

Primary House

Now in my primary house I need to sync recordings, SQL data, and then update the last successful run at the secondary house.

/home/mythtv/import.sh

#!/bin/sh

domain=rsync@address
sql_directory=/home/mythtv/sql
recordings_directory=/var/lib/mythtv/recordings
password_file=/home/mythtv/password-file
lastrun=/home/mythtv/lastrun

sync_recordings()
{
today=$(date '+%Y%m%d')
from=$(cat $sql_directory/recordings-list | sed "s,/var/lib/mythtv,$domain::mythtv,")
RET=30
while [ $RET -eq 30 ]; do
#rsync -avz --partial --timeout 120 --progress $from --password-file=password-file $recordings_directory
rsync -av --partial --timeout 120 --progress $from --password-file=$password_file $recordings_directory
RET=$?
done
echo "rsync return code: $?"
[ $RET -ne 0 ] && exit 1
echo "$today" > lastrun
rsync -avz --password-file=password-file lastrun $domain::lastrun/
}

sync_sql()
{
rsync -avz $domain::mythtv/exported-sql/* --password-file=$password_file $sql_directory
}

insert_sql()
{
CONFIG=$HOME/.mythtv/config.xml
db=`xpath  -q -e 'string(//DatabaseName)' $CONFIG 2>/dev/null`
user=`xpath  -q -e 'string(//UserName)' $CONFIG 2>/dev/null`
pass=`xpath  -q -e 'string(//Password)' $CONFIG 2>/dev/null`
host=`xpath  -q -e 'string(//Host)' $CONFIG 2>/dev/null`
old_host=supermario
new_host=kingkoopa
for fname in $(find $sql_directory -maxdepth 1 -name '*.sql');
do
if [ ! -f ${fname}.imported ]; then
cat $fname | sed "s,${old_host},${new_host},g; s,INSERT INTO, INSERT IGNORE INTO,g" > ${fname}.imported
mysql --host=$host --user=$user -p$pass $db < ${fname}.imported
fi
done
}

suspend()
{
sudo /usr/local/bin/setwakeup.sh $(date --date='18:00' '+%s')
sudo pm-suspend
}

mythfilldatabase
sync_sql
sync_recordings
insert_sql
#suspend

I'm careful about the order I do things.  The SQL has to get inserted last in case for some reason the recordings fail to sync or don't all sync while i'm watching.

I currently don't suspend afterwards due to some instability on my system, but I have been experimenting with that too.  If S3 is reliable you can configure the setup to suspend after the sync is done and wake up next time you need to use it or record from it.

I set the cronjob to run at midnight every day on the primary backend.

0 0 * * * /home/mythtv/import.sh

Thursday, December 1, 2011

Garmin Forerunner 405 and Ubuntu 11.10

Recently I purchased my first Garmin running watch from Amazon.  I decided to go with one from the Forerunner 405 family as I preferred the style, size and features compared to the others I came across.
    

At home I only have Ubuntu machines, but I still want access to all of my running data from the watch.  The older Garmin watches connected over USB to transfer data, but these newer ones use something called ANT+ to communicate with other wireless peripherals and to transfer data to computers.

The watch came with a USB dongle.  Unfortunately, Ubuntu 11.10's kernel doesn't have any drivers that automatically load when plugging it in.  After searching a little bit, I discovered that the usbserial module can be loaded using custom vendor and product ID's.

To do this, you can check lsusb to find the dongle.  Dynastream is the subsidiary of Garmin that owns the proprietary ANT+ technology.

# lsusb | grep Dynastream

Bus 001 Device 015: ID 0fcf:1008 Dynastream Innovations, Inc. 

Now that you have the vendor and product ID, you can manually load the usbserial module. 

# sudo modprobe usbserial vendor=0x0fcf product=0x1008

This will create a new /dev/ttyUSBx device on the system.  I only have one /dev/ttyUSB0, so t he rest of this assumes that's the same for you.  Next I found out that there is actually an app in the archive for fetching this data, it's just very poorly documented.  You can install it from the Ubuntu Software Center or manually install it:

# sudo apt-get install garmin-ant-downloader

Once installed, you have to wake up the watch, and get it in pairing mode.  For me this meant messing around with the bezzle until I could find the pairing menu and enable pairing.  Once pairing is on, it's just a matter of running the app manually once

# garmin-ant-downloader

The watch should say pairing worked properly.  Now go back to the training menu, and reset your run using the quit button so that the timer is back at zero.  This tells the watch that it's ready to send the data that it recorded before.  Put it in date/time mode.  It's OK if it falls asleep, ANT+ works either way.  Rerun the tool and it should place a tcx file for your run in the current working directory.

# garmin-ant-downloader

The tcx file that it spits out is complete, but in it's current form won't upload to http://connect.garmin.com.  Because of an empty name field.  This can be fixed with a simple sed command however.


So for me this is enough to at least get my runs recorded and data somewhere I can manage with Ubuntu 11.10 without too much pain.  On the TODO:
  1. Find a way to automatically load usbserial when this vid/pid shows up.  It doesn't seem to have any modaliases defined, so this might be troublesome and just require a udev rule.  Any suggestions here would be helpful.
  2. Figure out why the Name field isn't populated properly when downloading data

Tuesday, February 22, 2011

Updated packages for backfire

Recently an evolution of the Asterisk 1.8.x build that I submitted a ticket for at OpenWRT SVN has been accepted to OpenWRT trunk.

I've since then decided to recover my build environment and rebuild 1.8.2.3 using what landed upstream in trunk for backfire on ar71xx and brcm2.4.  I've also included the WIP patch for invisible support from http://www.personal.psu.edu/wcs131/blogs/psuvoip/2011/01/asterisk_hack_make_your_google.html

Note, invisible support is shared across clients because it's a proprietary google extension to Jabber.  If you set it on Asterisk, you still won't be able to be shown as visible from a regular client like GTalk for Android or Chat in GMail.

I'll try to keep an eye on https://issues.asterisk.org/view.php?id=18727 to see when it's properly included so that I'll switch to the patch upstream instead though.

Thursday, December 9, 2010

Outbound Google Voice dialing "proper" fix

As I mentioned in http://supermario-world.blogspot.com/2010/12/nov-30th-break-of-asterisk-18-w-gv.html, proper Google Voice outbound dialing got busted at the start of the month because of a protocol change on Google's servers.

While upstream worked on the patch (as detailed in https://issues.asterisk.org/view.php?id=18412), I had a workaround that used an AGI call back for the dialer.

Well a final patch has been developed now that accounts for the protocol changes and accepted into 1.8.x svn (https://issues.asterisk.org/file_download.php?file_id=27904&type=bug).  I expect there will eventually be a 1.8.1 maintenance release that includes this patch.

In the interim, i've rev'ed my packages to 1.8.0-2 and include this patch now.  You just need to opkg upgrade and you should receive the updates.

# opkg update
# opkg upgrade

You should undo any AGI dialer hacks that were added and revert to the original outbound google talk dialer.  If you have been using my dialplan, this should just be a two line change to comment out the AGI line and uncomment the Talk line.

so the outbound section of your extensions.conf should look like this:


[outbound]
include => seven-digit
include => local-devices
include => tollfree
include => talk-gmail-outbound
include => talk-numeric-outbound
include => dial-uri


As always, you can view my dialplan and settings at http://www.arctangent.net/~superm1/gv_configs/ in case you are missing something or joining in late.

And thanks to everyone who helped to make this patch happen!

Thursday, December 2, 2010

The Nov 30th break of Asterisk 1.8 w/ GV

On November 30th, Asterisk GV outbound dialing started breaking for people.  The cause was unknown, and it became more prevalent the next two days.

The symptoms are a continuous ringing for the outbound call with the following type of stuff in the logs:


[Dec  3 00:54:00] NOTICE[18023]: chan_gtalk.c:1942 gtalk_parser: Remote peer reported an error, trying to establish the call anyway

Inbound calls (including those initiated from the website) are still functional.  It's not clear what the cause is, but an issue has been filed with Asterisk upstream at https://issues.asterisk.org/view.php?id=18412

In the interim, I've come up with a way to fix the problem by reviving the old AGI dialer originally used with Asterisk 1.6, but reworking it to use Talk instead of Gizmo.

This involves some modifications to the dialplan to support using AGI instead.  If you don't already have AGI setup, here's the basics for that:

1) Install AGI support for Asterisk:

opkg install asterisk18-res-agi

2) Create the AGI directory

mkdir -p /usr/lib/asterisk/agi-bin/

3) Fetch the updated AGI script from http://arctangent.net/~superm1/agi/google-voice-dialout.agi and save it in /usr/lib/asterisk/agi-bin.  Modify it to include your login information for google.

cd /usr/lib/asterisk/agi-bin
chmod +x google-voice-dialout.agi

4) Modify your dialplan.

outbound
Instead of 
exten => _1NXXNXXXXXX,1,Dial(Gtalk/superm1/${EXTEN}@voice.google.com)
Make the line
exten => _+1NXXNXXXXXX,1,AGI(google-voice-dialout.agi)

inbound
Add the following two rules:
exten => superm1@gmail.com, 1, GotoIf(${DB_EXISTS(gv_dialout/channel)}?bridged)
exten => superm1@gmail.com, n(bridged),Bridge(${DB_DELETE(gv_dialout/channel)}, p)

This will bridge outgoing calls with an incoming dialback handler.

As previously, i'll post my updated configs to http://www.arctangent.net/~superm1/gv_configs/.  The way that i've implemented it is actually just a different AGI handler that's included.  So when regular talk support is restored (as mentioned in https://issues.asterisk.org/view.php?id=18412) then it's a one line change to re-enable the standard outbound talk handler.